Friday, 11 October 2013

How to Reset Ubuntu Password


If you have ever forgotten your password, you are not alone it is probably one of the most common tech support problems I have encountered over the years. Luckily if you are using Ubuntu they made it incredibly easy to reset your password.
All it takes is adjusting the boot parameters slightly and typing a command or two, but we will walk you through it.
  • Reset Your Ubuntu Password
Reboot your computer, and then as soon as you see the GRUB Loading screen, make sure to hit the ESC key so that you can get to the menu.


 If you have the option, you can choose the recovery mode item on the menu, usually found right below your default kernel option.
Then choose Drop to root shell prompt from this menu. 


This should give you a root shell prompt.
  • Alternate Root Shell Method 
If you do not have the recovery mode option, this is the alternate way to manually edit the grub options to allow for a root shell.
First you will want to make sure to choose the regular boot kernel that you use (typically just the default one), and then use the e key to choose to edit that boot option.

Now just hit the down arrow key over to the kernel option, and then use the e key to switch to edit mode for the kernel option.

You will first be presented with a screen that looks very similar to this one:
You will want to remove the ro quiet splash part with the backspace key, and then add this onto the end:
rw init=/bin/bash
Once you hit enter after adjusting the kernel line, you will need to use the B key to choose to boot with that option.
At this point the system should boot up very quickly to a command prompt.

  • Changing the Actual Password

You can use the following command to reset your password:
passwd < username >
After changing your password, use the following commands to reboot your system. (The sync command makes sure to write out data to the disk before rebooting).

sync
reboot -f
I found that the -f parameter was necessary to get the reboot command to work for some reason. You could always hardware reset instead, but make sure to use the sync command first.
And now you should be able to login without any issues.

Remove Genuine Advantage Notification in Windows 7

Windows 7 may sometimes been detected as illegal, not genuine,or Pirated despite the operating system has been genuinely bought from market. Then it shows a message immediately after log on, the following Windows Activation window will be displayed.
Windows is not genuine
Your computer might not be running a counterfeit copy of Windows.
0×80070005
 Moreover, the computer desktop background is turned to black, after some time of logging in and the following error message is shown on the bottom right corner of the screen:
This copy of Windows is not genuine
When you try to view the system information in System Properties (Control Panel -> System and Security -> System), the following error message can be seen:
You must activate today. Activate Windows now
Using slmgr.vbs /dlv or slmgr.vbs /dli in an elevated command prompt with administrator privileges to view the licensing status will return the following message instead:
Error: 0×80070005 Access denied: the requested action requires elevated privileges

Normally, the suddenly or random deactivation of an activated Windows 7 on genuine platform can be resolved by simply restarting the computer, so thatWindows 7 can re-access the activation status to return the computer to activated status. However, in some cases, where modification has been done to HKU\S-1-5-20 registry key causing the Network Service account to lose and missing full control and read permissions over the registry key, the losing of activated status may happen on Windows 7 too.
Microsoft explains in KB2008385 that the possible cause for the Windows 7 turned pirated error is likely the result of applying a Plug and Play Group Policy object (GPO):
Computer Configuration -> Policies -> Windows Settings -> Security Settings -> System Services -> Plug and Play (Startup Mode: Automatic)
The Windows 7 Licensing service uses Plug and Play to obtain hardware ID information and binds the license to the computer, thus change to the setting can result in an activated system appearing to be out of tolerance. The default permissions of the Plug and Play policy do not grant the Licensing service, which runs under the Network Service account, the appropriate rights to access the Plug and Play service. To fix and resolve the Windows 7 activation lost issue, and make the Windows 7 activated and genuine again, just follow one of the two Methods stated Below:

Method I: Disable the Plug and Play Policy 


  • Determine the source of the policy. To do this, follow these steps:
  • On the client computer experiencing the activation error, run the Resultant Set of Policy wizard by clicking Start >> Run (or press Win+R keys), and entering rsop.msc as the command. 


  • Visit the following location:
Computer Configuration -> Policies -> Windows Settings ->Security Settings -> System Services


 If the Plug and Play service is configured through a Group Policy setting, you see it here with settings other than Not Defined. Additionally, you can see which Group Policy is applying this setting.
  • Disable the Group Policy settings and force the Group Policy to be reapplied.
  1. Edit the Group Policy that is identified in Step 1 and change the setting to “Not Defined.” Or, follow the section below to add the required permissions for the Network Service account.
  2. Force the Group Policy setting to reapply: gpupdate /force (a restart of the client is sometimes required).
    Method II: Edit the permissions of the Group Policy
    1. Open the Group Policy that is identified in Method I, Step 1 above, and open the corresponding Group Policy setting.
    2. Click the Edit Security button, and then click the Advanced button.
    3. In the Advanced Security Settings for Plug and Play window click Addand then add the SERVICE account. Then, click OK.
    4. Select the following permissions in the Allow section and then click OK:Query template
      Query status
      Enumerate dependents
      Interrogate
      User-defined control
      Read permissions
    5. Run gpupdate /force after applying the permissions to the Group Policy setting.
    6. Verify that the appropriate permissions are applied with the following command:sc sdshow plugplay
      The following are the rights applied to the Plug and Play service in SDDL:D:(A;;CCDCLCSWRPWPDTLOCRSDRCWDWO;;;SY)
      (A;;CCDCLCSWRPWPDTLOCRSDRCWDWO;;;BA)
      (A;;CCLCSWLOCRRC;;;IU)
      (A;;CCLCSWLOCRRC;;;SU)
      S:(AU;FA;CCDCLCSWRPWPDTLOCRSDRCWDWO;;;WD)Note: (A;;CC LC SW LO CR RC ;;;SU is an Access Control Entry (ACE) that allows the following rights to “SU” (SDDL_SERVICE – Service logon user):A: Access Allowed
      CC: Create Child
      LC: List Children
      SW: Self Write
      LO: List Object
      CR: Control Access
      RC: Read Control
      SU: Service Logon User
    If there are no GPO’s in place, then another activity may have changed the default registry permissions. To resolve this problem, perform the following steps:
    1. Click Start Menu, Then Run, then enter REGEDIT
    2. Right-click the registry key HKEY_USERS\S-1-5-20, and select Permissions… button.
    3. If the NETWORK SERVICE is not present, click Add… button.
    4. In Enter the object names to select type Network Service and then click Check Names andOK.
    5. Select the NETWORK SERVICE and Grant Full Control and Read permissions.
    6. Restart the computer.
    7. After the restart, the system may require activation. Complete the activation.

    Thursday, 3 October 2013

    Employees Professional 4.9.7 >> Software + Crack

    Download link: https://www.dropbox.com/s/tbrddaa178cmc7u/Employees%20Professional%204.9.7.zip

    Employee Professionals is a full-service professional employer organization (PEO), a legal entity that acts as your proxy employer, with all the responsibilities of an employer, except for management and supervision.

    Employee Professionals is:

    1. more than a payroll service
    2. not a staffing or placement agency
    3. not a temporary worker service
    4. not a job outsource company


    Step 1: Download and unpack zip archive.
    Step 2: Run the setup
    Step 3: Use the given keygen to activate.
    Step 4: Enjoy and Support Developers, Buy It, They Deserved It!

    Monday, 30 September 2013

    How to Activate Microsoft Office 2013: 32bit + 64bit _ Download Office 2013 Activator

    Before start make sure your internet connection ON and Disable the firewall till you activate your product.
    1. Open The folder Double Click Start-KMSmicro.vbs and start KMSmicro action.
    2. Please be patient and allow KMSmicro load [It take 5 min in my Vmware]
      wait...
      wait...
    3. Here is the KMSmicro menu Screen. When you come this stage Type >>> t <<<< (Run NetTime). If you can not type hold Ctrl+Alt to make your mouse works [This will syncronice the server time round the world]
    4. Click yes for Host Address Time
    5. After clicking yes open the folder and Run Activation Helper v1.5 File
      [
      Use x64 for 64 bit Office or x86 for 32 but Office]
    6. Click Office or Windows Tap wharever product you want to activate. Then if it is office Click Activate Office 2013 / Office 2010.
    7. Wait till you get the screen `Product Activation Successful

    Thursday, 19 September 2013

    How can I run multiple Skype accounts on Windows desktop?

    To use more than one Skype account on the same computer at the same time, you need to start a new instance of Skype.
    1. From the Windows taskbar, click Start > Run (or press the Windows The Windows key. and R keys on your keyboard at the same time).
    2. In the Run window, type the following command (including the quotes) and press OK:
    3. For 32-bit operating systems:
      "C:\Program Files\Skype\Phone\Skype.exe" /secondary
      For 64-bit operating systems:
      "C:\Program Files (x86)\Skype\Phone\Skype.exe" /secondary
    If you get an error message, copy and paste the exact command from this page and try again.
    Be aware that if you’ve changed the installation path for Skype, then you’ll need to enter the correct path for the Skype.exe file.
    If the above solution fails, you can try another option:
    1. Find the Skype.exe file in C:\Program Files\Skype\Phone\ if you’re running a 32-bit operating system.
    2. If you’re running 64-bit operating system, you can find the file in C:\Program Files (x86)\Skype\Phone\.
    3. Right-click the file and select Send to > Desktop (create shortcut).
    4. Locate the shortcut on your desktop, then right-click it and select Properties.
    5. In the Target field of the Shortcut tab, add /secondary to the end of the path. The Target field should now be "C:\Program Files\Skype\Phone\Skype.exe" /secondary.
    6. Click OK. You can now start a new instance of Skype every time you double-click the new shortcut.

    Wednesday, 18 September 2013

    Remove Shortcut Arrow from Shortcut Icons

    To remove shortcut arrow from desktop icons in any type of document:


    • Perform instructions described under 'Remove shortcut arrow from desktop icons'. For your convenience, steps 1 to 3 are reported here.
    • Perform instructions described under 'Remove shortcut arrow from desktop icons (2)'. For your convenience, steps 4 and 5 are reported here.
    • And finally, do the same with conferencelink, docshortcut, internetshortcut and wshfile.
    So, here is a summary of all actions:
    1. Start regedit.
    2. Navigate to HKEY_CLASSES_ROOT\lnkfile
    3. Delete the IsShortcut registry value.
    4. Navigate to HKEY_CLASSES_ROOT\piffile
    5. Delete the IsShortcut registry value.
    6. Navigate to HKEY_CLASSES_ROOT\ConferenceLink
    7. Delete the IsShortcut registry value.
    8. Navigate to HKEY_CLASSES_ROOT\DocShortCut
    9. Delete the IsShortcut registry value.
    10. Navigate to HKEY_CLASSES_ROOT\InternetShortcut
    11. Delete the IsShortcut registry value.
    12. Navigate to HKEY_CLASSES_ROOT\WSHFile
    13. Delete the IsShortcut registry value.
    14. Close regedit.

    Logoff and... Enjoy!

    Note : Please note that in some cases deactivating the arrow for *.LNK files might lead to duplicate items in the Explorer Context menu.

    Tuesday, 17 September 2013

    Hide TORRENT completely from your PC

    1. First install BitTorrent software in on the PC. After installing that software just run it.
    2. After opening BitTorrent window click on Options and in that select Preferences option or just click Ctrl+P. A new preference window will open.
    3. In Preferences window click General option and in that you will see both “Check association on startup” and “Start BitTorrent on system startup” options are checked by default. Now uncheck those two options.
    1. In the same window you will see the Boss-Key option. By default the value is None. Just click on that box and set any shortcut key to open and close BitTorrent software. For example click Alt+A key in that box to set that shortcut.
    2. Click Apply and OK button.
    3. Now just click Alt + A key (see step 4) to open/close BitTorrent software window. Now we get BitTorrent to auto start in hidden mode. To do that just follow a few more steps.
    4. Go to the folder where you have installed BitTorrent software and in that select BitTorrent.exe and rename it to some other name (ex: system42.exe) so that it cannot be detected in Task Manager (alt+ctrl+del).
    5. Now on your desktop right click and select New >> Shortcut option and then click Browse button and select the renamed BitTorrent.exe (system42.exe if you renamed).
    6. Now you will see the BitTorrent icon on the desktop. Select that icon and right click and click Property option. In Property window select the Shortcut tab. You will see a Target box with the value or similar. Type "C:\Program Files (x86)\BitTorrent\BitTorrent.exe" (or whatever you renamed "Bittorrent.exe" to).
    7. Now just add /hide to that box now it will look something like this "C:\Program Files (x86)\BitTorrent\BitTorrent.exe" /hide
    8. That’s it. Copy this icon to your startup folder (All Programs >> Startup).
    Now whenever your PC starts BitTorrent will run in hidden mode and automatically start downloading files without showing the icon in your system tray. To open/close Bittorrent use the shortcut key you set.

    Follow the same above steps for uTorrent.

    Monday, 16 September 2013

    How to Activate Windows 7 - Windows Loader Crack

    1. Click the link below and download the utility.
      Windows Loader
    2. Extract the downloaded zip on your system.
    3. Run "Windows Loader.exe" file and click on Install.
    4. After installing the windows loader it will reboot your system.

    It will take time at startup for the first time.
    And now you are done. :)

    Thursday, 29 August 2013

    How to remove Windows Genuine Problem


    1. Click the link below and download the utility.
    2. http://www50.zippyshare.com/v/87463309/file.html
    3. Extract the downloaded zip on your system.
    4. Run "Remove WAT.exe" file and click on Remove WAT.
    5. After completing the setup reboot your system.

      It will take time at startup for the first time.
      And now you are done. :)

    Wednesday, 6 March 2013

    Remote Access uTorrent


    What is µTorrent Remote

    µTorrent Remote is a simple and secure web service that enables access to µTorrent from anywhere on the internet. Just create an account and you're done. There's no complicated network setup required. Head to remote.utorrent.com from any browser (even mobile!) to manage your torrents. When downloads complete, you can even pull the content to your remote device.

    How do I get an account?

    µTorrent Remote is unlike most other web services. Because we connect to your remote µTorrent client and keep your information private, we do not allow you to sign up on this web site. Instead, you must sign up for an account within the client.
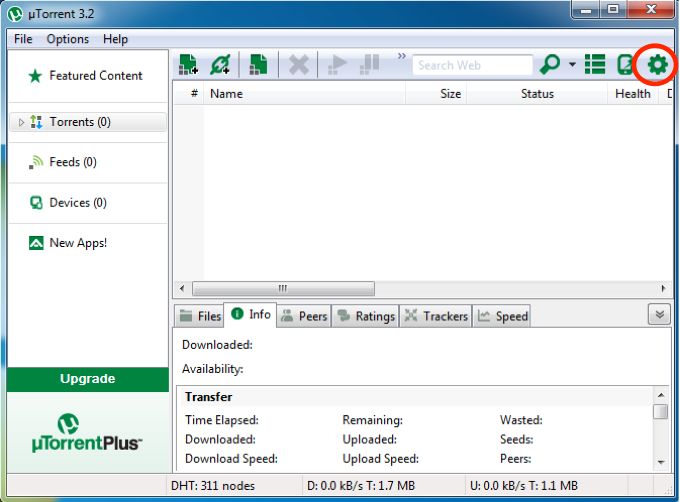
    µTorrent Remote Access Preferences button in the µTorrent toolbar
    Click the µTorrent Remote Access Preferences button in the µTorrent toolbar.
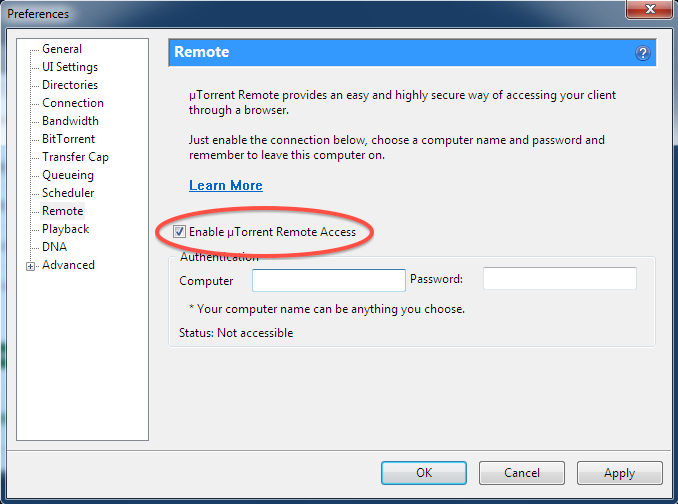
    µTorrent Enable Remote Access in the µTorrent settings
    Select the "Remote" section and check "Enable µTorrent Remote Access".
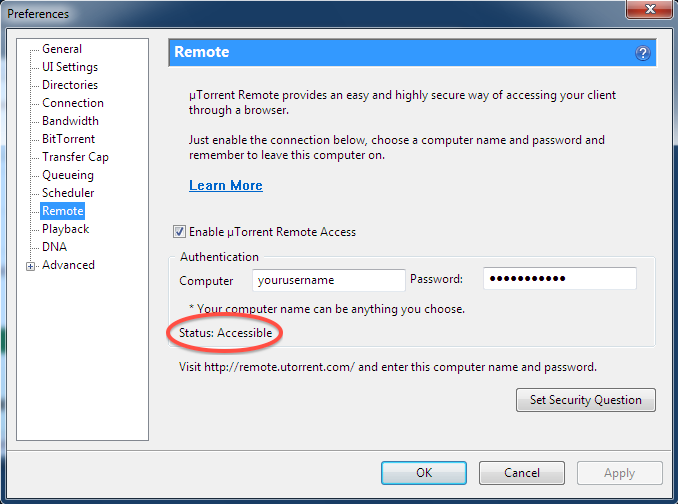
    µTorrent Username and Password for Remote Access in the µTorrent settings
    Choose a Computer name and password and enter it here. Click the "Apply" button. After a few seconds, you should see "Status: Accessible" or "Status: Registered". Close the preferences.
    That's it. Congratulations! You can now access your client from anywhere at https://remote.utorrent.com.
    You can also download the free ÂµTorrent Remote app for Android.

    Wednesday, 16 January 2013

    Hack Windows 7 Password - Reset

    Forgetting your password is never any fun, but luckily there’s a really easy way to reset the password. All you need is a copy of the Windows installation disk and one simple command line trick.

    Resetting Your Forgotten Windows Password

    Boot off the Windows disk and select the “Repair your computer” option from the lower left-hand corner.
    image
    Follow through until you get to the option to open the Command Prompt, which you’ll want to select.
    image
    First you’ll want to type in the following command to backup the original sticky keys file:
    copy c:\windows\system32\sethc.exe c:\
    Then you’ll copy the command prompt executable (cmd.exe) over top of the sticky keys executable:
    copy c:\windows\system32\cmd.exe c:\windows\system32\sethc.exe
    image
    Now you can reboot the PC.

    Resetting the Password

    Once you get to the login screen, hit the Shift key 5 times, and you’ll see an administrator mode command prompt.
    image
    Now to reset the password—just type the following command, replacing the username and password with the combination you want:
    net user geek MyNewPassword
    image
    That’s all there is to it. Now you can login.
    Of course, you’ll probably want to put the original sethc.exe file back, which you can do by rebooting into the installation CD, opening the command prompt, and copying the c:\sethc.exe file back to c:\windows\system32\sethc.exe.

    Wednesday, 9 January 2013

    Windows 8 Features

    Following the release of Windows 8 Developer Preview, many sites have done reviews on what the next Windows system will be like. The reviews are mostly positive, with some hailing Windows 8 as the next revolution in the technology of computer operating systems (OS). Such may well be the ambition of Microsoft, and it should not surprise time it comes at a time when Apple’s share of the OS market is rising and pitting fiercely against them.
    windows 8 features
    If there’s one thing great about competition, it is that it brings out the best product between companies. I’ve read up some of the features that Microsoft’s Windows 8 will be offering, and am now both intrigued and excited for what’s to come in the full version. It will even come with a new and unique kind of user interface (UI) known as the Metro.
    Here are brief descriptions to some top features you would be keen to know about:

    1. Speedy Boot Time

    The load and boot up speed has improved significantly over Windows’ predecessors. This is partly due to the better resource allocations to applications and the system. When compared to Windows 7 desktop CPU, Windows 8 has an even speedier boot time.
    speedy boot time
    (Image Source: Within Windows)
    How did they improve so much over Windows 7? Well, Windows 8 employs a technique of hibernating the system kernel (think of it as your OS’s resource manager) when you shut down, such that it becomes almost like a partial hibernation each time. When you reboot the system, the‘memory’ of your previous session gets reinitialized quicker.

    2. Innovative & Dynamic Desktop

    The tiles-based interface, or the Metro UI, will be the first thing you see upon logging in to Windows 8. At first glance, the UI seems to go intuitively with touchscreen devices like tablets and smartphones. Indeed, in such devices, you tap on those apps to open them. The grid layout seems to facilitate such interactions. Needless to say, you can customize your grid by adding and arranging applications.
    innovative dynamic desktop
    (Image Source: JRtheTech)
    The coolest thing, however, is that not only does Windows 8 allows you to personalize your desktop with the organization of the apps, it is also able display real-time information through them. Microsoft had demonstrated how the tile for a weather app could reveal the current temperature in a city without having to activate the app. The same goes for emails and such. In one glance over your tiles, you can have access to all that you need to be notified and take action on those which are urgent.

    3. Improved Search Function

    8 has no search box at the bottom of the Start menu. Heck, it doesn’t even have the trademark Start menu! That doesn’t mean that there’s no convenient search function available. All you need to do is to type anything, and a search box will appear from the right and give you the results. The search capability is even stronger this time, displaying all the matching apps and files instantaneously.
    improved search functionm
    (Image Source: JaisonYR)
    Unlike Windows 7, Windows
    You can also search within apps that utilize Windows 8′s search function. The search pane that pops out on the right of your desktop will contain the list of apps which you can conduct the search in. For instance, if you’re looking for the emails sent by a particular contact, typing that name and clicking on the email app would allow you to search from within.

    4. Windows To Go

    Of the entire list here, this is one feature that offers the most convenience to users. Windows To Go allows users to make a copy of their OS complete with their settings, wallpapers, files and even apps, into a USB thumb drive. Plugged it into another computer with Windows 8 already installed, and you can boot up the PC and make it look exactly alike the OS you normally use, with all settings intact.
    windows to go
    (Image Source: Engadget)
    It sounds rather amazing, doesn’t it? The potential for such a feature is high and possibilities, many. For one, a virus-infected and crashed system could be revived by simply plugging in the USB thumbdrive with your last saved settings, inclusive of all your files, apps, etc. Users don’t have to worry about losing the ability to work on their projects just because their PC is down; they can always rely on plugging in that thumbdrive into another Windows 8-installed PC. Another is that users may simply bring back work from the office with that thumbdrive rather than a much bulkier laptop.

    5. Windows Live Syncing

    Similar to Windows To Go, the new Windows 8 will provide Windows Live syncing, such that users can login on any Windows 8 PC with ‘Live ID’ and get back their own personalized settings on it. The desktop will look the same every time the user login on a PC with their Windows Live account.Migrating to a new PC is probably made easier when the user has all the essential settings synced.
    windows live syncing
    (Image Source: Windows 8)
    How different will this be from Windows To Go? Well, Windows To Go seem to serve more as a controlled device for IT administrators to distribute to employees (with exact duplicates of Windows 8 with the same settings, wallpapers, apps, etc on thumbdrives), while Windows Live Syncing is more to allowing users to keep the basic settings and data available even if they’re away from their primary PC. We can only anticipate how the former and latter will be truly be like until they are unveiled by Microsoft in due course.

    Sunday, 6 January 2013

    Block Website

    Lets assume that you want to block a site www.gooogle.cn, you can edit your HOSTS file using the following steps :
    1. First of all you have to open an elevated command prompt. To do this, click on the start menu button (blue orb at the lower-left corner of your screen). Type in cmd in the search box, right-click on cmd.exe when it appears and choose Run as administrator as shown. You may have to click Yes in the UAC dialog.
      Block Websites using HOSTS file
    2. In the elevated command prompt window, type in the following command and press Enter:
      notepad %windir%\system32\drivers\etc\hosts
      Block Websites using HOSTS file
    3. This would open your hosts file in Windows' Notepad. Start editing at the end of the file : PressEnter to start a new line. Type 127.0.0.1. Press TAB key once. Then type the name of the site you want to block, in this case, gooogle.cn. You do not have to type the http:// or www. part of a web site. Then end result will look like this :
      Block Websites using HOSTS file
    4. Save the hosts file by pressing Ctrl + S hotkey or using File → Save. Now when you typegooogle.cn in your browser, it will be redirected to 127.0.0.1 and you will not be able to access it. This site or domain is now blocked for each and every program in Windows.


    Redirecting a Web Site

    You can redirect a web site to another site using the same method as described above for blocking, except replace 127.0.0.1 by the target site address. For example, suppose you want to redirect your browser to www.google.com whenever someone types www.facebook.com in the browser address bar, then follows these steps :
    1. Open hosts file in Windows' Notepad as described in the blocking section step 1 (see above).
    2. Find out IP address of www.google.com using this article : Find the ip address of a site. (IP address is found out to be 74.125.53.100)
    3. Start editing at the end of the HOSTS file : Press Enter to start a new line. Type74.125.53.100, press TAB key once followed by facebook.com. Save the hosts file.
    Now whenever you (or someone else) types in your browser's address bar www.facebook.com, he/she will be redirected to www.google.com.

    Friday, 4 January 2013

    Customize Windows Run Command


    Step 1: Go to "Start," "Run," (told you we use it a lot) and type regedit.
    Step 2: Navigate to the following:
    HKEY_LOCAL_MACHINE\SOFTWARE\Microsoft\Windows\CurrentVersion\Apps Path
    Step 3: Create a new folder/key under Apps Path. (Right-Click Apps Path and click "New," "Key.")
    Step 4: Title the new folder/key the name of the application, e.g. firefox.exe.
    Step 5: Right-Click the default string value (the thing automatically created in your new folder) and click Modify.
    Step 6: Change the value to the path of the executable you are attempting to run. E.g. C:\Program Files\Mozilla Firefox\firefox.exe.
    Step 7: Create a new "String Value" by right-clicking under the default value (the thing we just edited) and select "New," "String Value." Name it Path and enter the value as the same path you previously entered.

    Step 8: Done! Now, all you need to do is go to “Start,” “Run,” and type the name of your command!

    Disclaimer: Modifying the registry can cause serious problems that may require you to reinstall your operating system. I cannot guarantee that problems resulting from modifications to the registry can be solved. Use the information provided at your own risk.

    Hack Filezilla FTP saved Password

    Export your Site Manager information and you'll find them in plain text:
    File > Export > Export Site Manager entries

    
     ftp.example.com
     21
     0
     0
     root
     mypass
     [etc]


    © 2013 Secrect Hack. All rights resevered. Designed by Templateism

    Back To Top